
5 Picture Hanging Tips Every Beginner Needs to Know
YOUR DIY WALL ART HANGING GUIDE
You’ve Bought Your Wall Art But How do You Hang it?
Your beautiful piece of art is staring at you from the floor, while you stare at the wall, nail in hand, wondering where on earth to start!
Sound familiar?
Whether you're decorating your first home, refreshing a rental, or finally tackling that gallery wall you've been planning for two years, these five expert tips will get your art up, level, and looking brilliant.

Always Hang Wall Art at Eye Level
The single most common picture hanging mistake is hanging it too high. As a rule, the centre of your artwork should sit between 145 cm and 152 cm from the floor. This is the internationally recognised eye-level sweet spot used by galleries and interior designers alike.
But what part of the picture should be at eye level?
You might think that would be the top or the bottom of the frame but it’s actually the centre of your picture frame.
Are there exceptions to the eye level rule?
There are:
In rooms where you're mostly seated — such as a dining room or home office — drop the centre point slightly lower to about 130–135 cm.
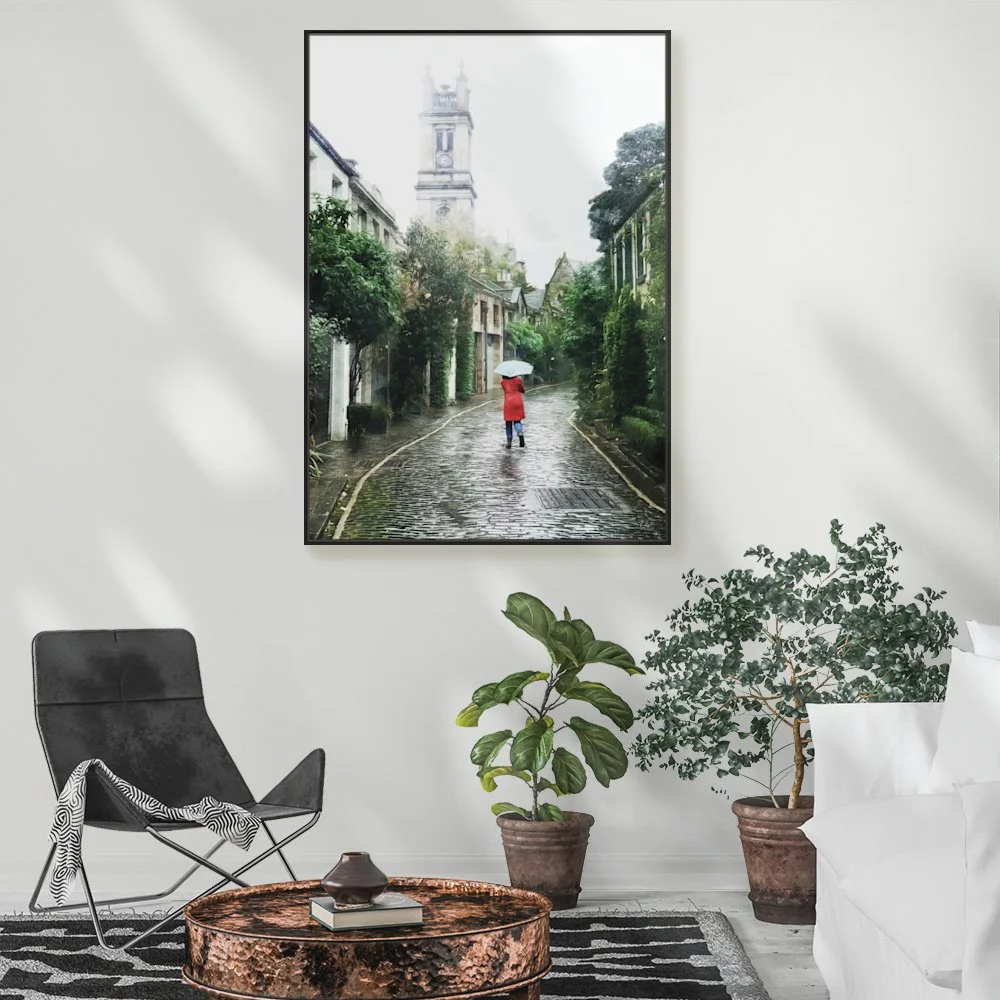
When hanging artwork above furniture like a sofa or bed, position the bottom of the frame no more than 20–25 cm above the piece beneath it. This creates a visual connection between the furniture and the art, rather than leaving your artwork floating awkwardly near the ceiling.
Quick Rules:
Centre of artwork = 145–152 cm from the floor.
Above a sofa or bed, leave 20–25 cm of breathing room between the furniture and the bottom of the frame.

Know Your Wall: Choose Your Hardware Accordingly
Getting the hardware wrong is how pictures end up on the floor, sometimes taking a chunk of wall with them and often damaging your treasured artwork. Our homes are full of plasterboard (also called Gyprock or drywall), and it behaves very differently to brick or concrete as it’s made from 10-13mm thick sheets of plaster sandwiched between heavy weight paper. As you might expect, it’s not very strong!
How do you know what to hang your wall art with?
What you hang your pictures with depends on the weight:
For lightweight frames under 5 kg on plasterboard, *adhesive strips or Command™ strips are a clean, hole-free option — perfect for renters.
For medium-weight pieces up to 20 kg, *claw-style picture hooks are a brilliant and favourite option. Simply push the steel claw directly into the plasterboard at a 45-degree angle — no drill required.
For anything heavier than 20 kg, you'll need to locate a wall stud using a stud finder and screw directly into it for a secure hold.
On brick or masonry walls, you'll need a masonry drill bit and a wall plug before inserting your screw.
Quick rules:
Under 5 kg → adhesive strips. Up to 20 kg → claw hooks into plasterboard.
Over 20 kg → find a stud or use a masonry anchor.

Use the Toothpaste Trick to Nail Your Wall Art Placement First Time
Measuring twice and drilling once is the golden rule when it comes to hanging wall art but there's an even simpler method that every beginner should know.
Apply a small dab of toothpaste to the hanging point (hook, D-ring, or wire) on the back of your frame. Hold the frame against the wall exactly where you want it, then press it firmly. When you lift the frame away, the toothpaste leaves a precise dot on the wall showing exactly where your nail or hook needs to go.
What about picture frames that have two hanging points?
Heavier pieces may have two fixing points so if your frame does here’s a good tip to get that spacing just right:
Stretch a piece of masking tape across the back of the frame between both fixings and mark the centre of each point with a pencil.
Next peel the tape off the back of your frame and stick it to the wall in position. Use a spirit level to help make sure it’s level.
You can then screw or nail through the tape marks. You’ll have perfect spacing every time!
Quick rules:
Toothpaste on the hook → press to wall → perfect placement dot.
For two hooks, use painter's tape across the back to transfer measurements directly to the wall.

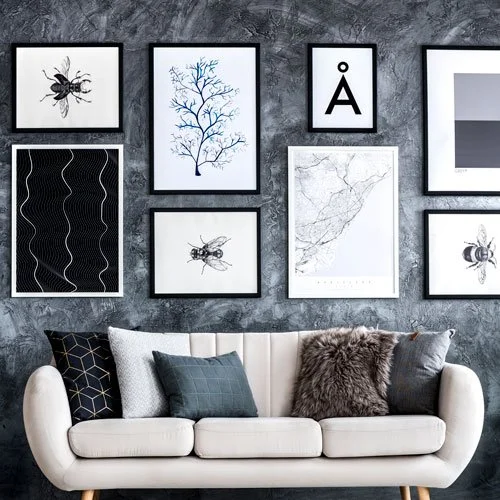
Plan Your Gallery Wall on the Floor Before You Touch the Wall
Gallery walls look effortlessly curated, but they take a little planning to get right. The most common mistake is jumping straight to the wall and ending up with an arrangement that feels lopsided or cramped. Instead:
Lay all your frames on the floor first and experiment with the layout until you're happy.
Take a photo on your phone before you start moving things, it'll be your reference guide.
Once you've settled on a layout, cut paper or cardboard templates the same size as each frame and use low-tack masking tape or blu-tack to stick them to the wall. This lets you live with the arrangement for a day or two before committing to any holes.
As a spacing guide, leave approximately 5–8 cm between frames. This is enough breathing room to let each piece register without gaps that feel awkward. Anchor the arrangement with your largest piece first, then build outward from there.
Quick rules:
Lay frames on the floor first → photograph the arrangement → use paper templates on the wall before drilling.
Leave 5–8 cm between frames.

Hang Wall Art Away from Direct Sunlight AND Consider Your Lighting
In sunny Australian homes, this tip matters more than most people realise. Hanging artwork in direct sunlight will cause colours to fade and paper to yellow surprisingly quickly, especially prints, watercolours, and photographs. Choose a spot that receives indirect or diffused natural light to protect your investment for the long term.
Equally as important is how you light your art intentionally. A well-placed picture light or an angled downlight from the ceiling can transform a piece from background noise to the centrepiece of a room. If you're using overhead lighting, aim for the light source to hit the artwork at roughly a 30-degree angle. This illuminates the piece without causing glare on glass. *Battery-operated LED picture lights are an excellent option for renters or for walls where adding fixed lighting isn't practical.
Quick rules:
Avoid direct sun to prevent fading.
Use a picture light or angled downlight at 30 degrees for maximum impact. LED battery lights are perfect for rentals.
*Please note: External links in this blog are simply examples of the picture hanging products mentioned. I don’t endorse any of them, so please do your homework on the products and brands that are best for you, before you buy. :)
Frequently Asked Questions
Quick answers to all of your questions about hanging wall art:
How high should I hang a picture on the wall?
The centre of your artwork should sit 145–152 cm from the floor — this is the standard eye-level rule used by galleries and interior designers. If the art hangs above furniture such as a sofa or bed, position the bottom of the frame 20–25 cm above the top of the furniture piece.
How do I hang pictures without making holes in the wall?
Adhesive picture hanging strips — such as Command™ strips — are the most popular damage-free option. They adhere to painted plasterboard, timber, tile, glass, and metal without leaving holes. Always check the weight rating on the packaging, and clean the wall surface with isopropyl alcohol before applying for best adhesion.
What is the best hook for plasterboard walls?
Claw-style picture hooks are widely considered the best option for Australian plasterboard walls. The stainless steel claw is pushed in at an angle — no drill required — and can hold up to 20 kg. They create a very small hole and are available at Bunnings and most hardware stores.
How far apart should I space pictures in a gallery wall?
A gap of 5–8 cm between frames is generally recommended for gallery walls. This provides enough visual separation for each piece to be appreciated individually while keeping the arrangement cohesive. Consistent spacing throughout the arrangement creates a more polished, professional look.
Can I hang heavy pictures on a plasterboard wall?
Yes, but you need the right approach. For pieces weighing more than 20 kg, you should locate a wall stud using a stud finder and screw directly into it. Standard plasterboard alone is not designed to support heavy loads without a stud or specialised toggle anchor behind it.
Is it worth hiring a professional picture hanging service?
For large, heavy, or valuable pieces — or for complex gallery wall arrangements — a professional picture hanging service is absolutely worth considering. Professional services operate in most major Australian cities including Sydney, Melbourne, Brisbane, and the Gold Coast. They bring the right tools, experience with all wall types, and take full responsibility for the result.